HTML Basics: A Beginner’s Guide to Creating Web Pages | Part 1
Are you excited to start creating your own web pages? I introduce you to HTML, which stands for HyperText Markup Language. It is the foundation of every webpage on the internet. Don’t worry if you’re new to coding – in this tutorial, you will be taken by hand through the basics of HTML to start your web development journey.
What is HTML?
HTML is a markup language understood by the browsers. It’s used to structure the content of web pages and tell browsers how to display that content. Think of HTML as the bones or building blocks of a webpage – it defines headings, paragraphs, images, links, and more. This language primarily employs tags – special terms enclosed by “<” (less than) and “>” (greater than) symbols – to mark positions for integrating other programming or styling languages. For instance, the “<p>” tag signifies a paragraph. It’s important to note that tags need both an opening and closing part (“<p>” to open, “</p>” to close) and enclose content in between, such as: “<p>This text is enclosed within p tags</p>“.
Setting Up
You’ll need a text editor before you dive into writing HTML code. You can use simple text editors like Notepad (Windows) or TextEdit (Mac), or specialized code editors like Visual Studio Code or Sublime Text. Once you have a text editor ready, follow these steps:
- Open your Text Editor: Launch your chosen text editor on your computer.
- Create a New File: Click on “File” and then “New” to create a new, blank file.
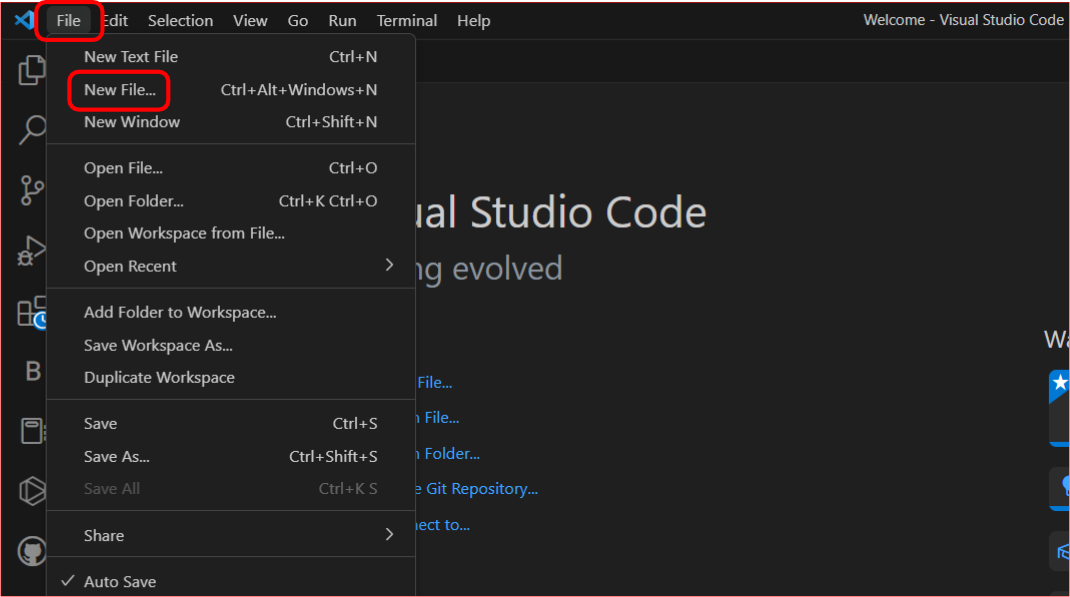
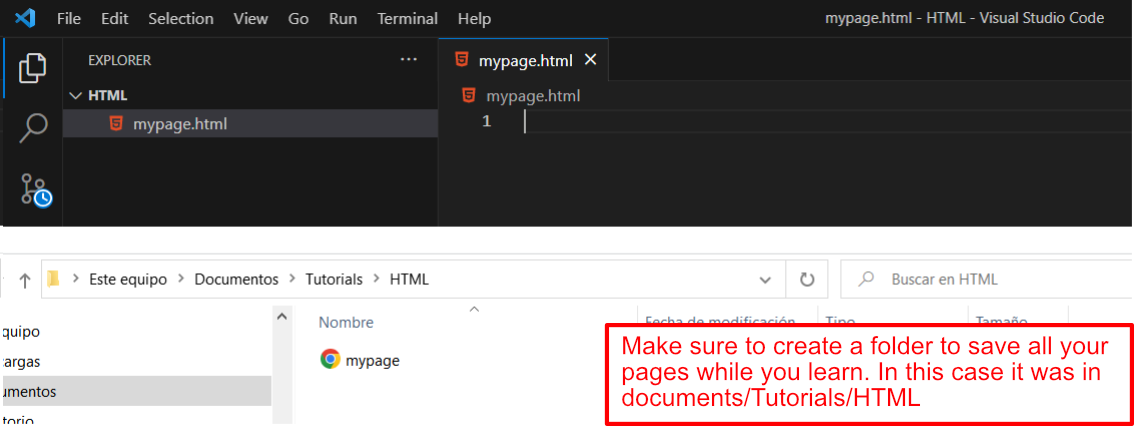
- Save the File: Save the file with as “.html” extension, like “mypage.html”. This is where you’ll write your HTML code.
Your First HTML Code
Let’s start with a simple HTML structure. Copy and paste the following code into your newly created “.html” file:
html
<!DOCTYPE html> <html> <head> <title>My First Web Page</title> </head> <body> <h1>Hello, World!</h1> <p>This is a paragraph on my web page.</p> </body> </html>Now, let’s break down what you just wrote:
<!DOCTYPE html>: This declaration tells the browser that you’re using HTML5, the latest version of HTML.<html>: This is the root element of your HTML document. It contains all other elements.<head>: This section contains meta-information about your page, like the title that appears in the browser’s tab.<title>: This tag sets the title of your webpage. It will be seen in the browser tab.<body>: This is where the visible content of your webpage goes.<h1>: This is a heading element. Headings come in different levels, from<h1>(highest importance) to<h6>(lowest importance).<p>: This is a paragraph element. It’s used for regular text content.
Here is how it looks like in the code editor:
Adding Images and Links
HTML allows you to add images and links to your webpage. Here’s how:
Adding an Image
To add an image, you can use the <img> tag. Modify your HTML code like this:
html
<img src="your-image-url.jpg" alt="A beautiful image">
Replace "your-image-url.jpg" with the actual URL of the image you want to use.
Adding a Link
To add a link, use the <a> tag. Modify your HTML code like this:
html
<a href="https://www.example.com">Visit Example.com</a>
Replace "https://www.example.com" with the URL you want to link to.
Viewing Your Webpage
After writing your HTML code, it’s time to see your webpage in action. Follow these steps:
- Save your HTML file.
- Open it in a Web Browser: Double-click on your “.html” file. It will open in your web browser.
Congratulations! You’ve created your first web page using HTML. As you continue your web development journey, you’ll discover more HTML elements and how to style your pages using CSS (Cascading Style Sheets).
Remember, practice makes perfect. Don’t be afraid to experiment and explore new HTML tags to enhance your web pages further. Happy coding!